iOS 10 Public beta version does not support PPTP anymore for security consideration. In a previous blog, I’ve shown how to setup PP2P VPN server on Ubuntu 14.04. Now, let’s setup L2TP/IPSec VPN.
Step 1: Install requirements
First change to sudo mode, because we’ll have to use sudo many more times.
1
sudo-s
then,
1
apt-get install openswan xl2tpd ppp lsof
Step 2: Configure firewall
1
iptables -t nat -A POSTROUTING -j SNAT --to-source %YOUR-SERVER-IP% -o eth
Here, please replace %YOUR-SERVER-IP% (remove % of course) do the following to modify /etc/sysctl.conf:
1
2
3
4
5
6
7
8
9
echo"net.ipv4.ip_forward = 1" | tee -a /etc/sysctl.conf
echo"net.ipv4.conf.all.accept_redirects = 0" | tee -a /etc/sysctl.conf
echo"net.ipv4.conf.all.send_redirects = 0" | tee -a /etc/sysctl.conf
echo"net.ipv4.conf.default.rp_filter = 0" | tee -a /etc/sysctl.conf
echo"net.ipv4.conf.default.accept_source_route = 0" | tee -a /etc/sysctl.conf
echo"net.ipv4.conf.default.send_redirects = 0" | tee -a /etc/sysctl.conf
echo"net.ipv4.icmp_ignore_bogus_error_responses = 1" | tee -a /etc/sysctl.conf
for vpn in /proc/sys/net/ipv4/conf/*; doecho0 > $vpn/accept_redirects; echo0 > $vpn/send_redirects; done
Apply the above change with
1
sysctl -p
Step 3: Change /etc/rc.local
1
vim /etc/rc.local
Before the line exit 0, add the following line (remember to replace %YOUR-SERVER-IP%), to make sure the modifications still work after reboot:
1
2
for vpn in /proc/sys/net/ipv4/conf/*; do echo 0 > $vpn/accept_redirects; echo 0 > $vpn/send_redirects; done
add the following in the end of the file (remember to replace %YOUR-SERVER-IP%):
1
2
3
4
5
6
7
8
9
10
11
12
13
14
15
16
17
18
conn L2TP-PSK-noNAT
authby=secret
pfs=no
auto=add
keyingtries=3
rekey=no
ikelifetime=8h
keylife=1h
ike=aes256-sha1,aes128-sha1,3des-sha1
phase2alg=aes256-sha1,aes128-sha1,3des-sha1
type=transport
left=%YOUR-SERVER-IP%
leftprotoport=17/1701
right=%any
rightprotoport=17/%any
dpddelay=10
dpdtimeout=20
dpdaction=clear
now, add the following line to /etc/ipsec.secrets (remember to replace %YOUR-SERVER-IP% and your-password):
1
%YOUR-SERVER-IP% %any: PSK "your-password"
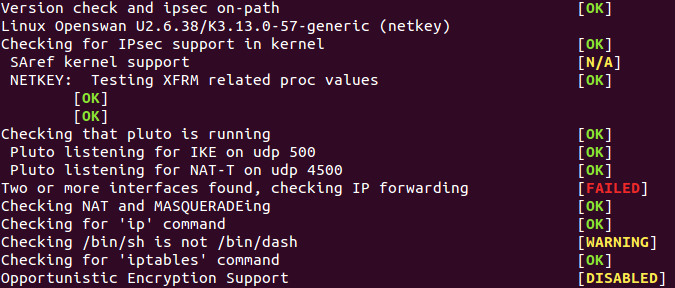
now use
1
ipsec verify
to check errors, it may show something like this: The errors and warnings are okay. the Failed error is caused by an old perl version and can be ignored.
Step 5: Configure xl2tp
1
vim /etc/xl2tpd/xl2tpd.conf
add the following lines to the end:
1
2
3
4
5
6
7
8
9
10
11
12
13
14
15
16
17
[global]
ipsec saref = yes
saref refinfo =30
;debug avp = yes
;debug network = yes
;debug state = yes
;debug tunnel = yes
[lns default]
ip range =172.16.1.30-172.16.1.100
local ip =172.16.1.1
refuse pap = yes
require authentication = yes
;ppp debug = yes
pppoptfile = /etc/ppp/options.xl2tpd
length bit = yes
now, create options.xl2tpd
1
vim /etc/ppp/options.xl2tpd
add the following:
1
2
3
4
5
6
7
8
9
10
11
12
13
require-mschap-v2
ms-dns 8.8.8.8
ms-dns 8.8.4.4
auth
mtu 1200
mru 1000
crtscts
hide-password
modem
name l2tpd
proxyarp
lcp-echo-interval 30
lcp-echo-failure 4
now, add your VPN accounts:
1
vim /etc/ppp/chap-secrets
each line is one account, you can add multiple lines:
1
2
3
# Secrets for authentication using CHAP
# client server secret IP addresses
your_user_name l2tpd your_password *
Step 6: Restart the services
1
2
serviceipsec restart
service xl2tpd restart
Client configurations
Take iOS 10 for example, choose L2TP, use your account and PSK Enjoy.